SEARCH RESULTS
37 results found with an empty search
- Planning is everything: I'm finally ready to carve-Part 2
At this point, I have already spent several hours and I haven't begun to carve this block, which will be a 12 x 20 inch framed reduction print. In part one of the series, I described the process of drawing on tracing paper and transferring the drawing onto the linoleum and tracing my rubbing lines with a Sharpie. I keep my original drawing close by throughout the process. I am constantly referring to it so I know what to do next. Things get complicated with a five color reduction print. The drawing on tracing paper The drawing is transferred and traced with a Sharpie I can use just one color of marker, or use several colors. This is a complicated image, so I am using several markers, just so I can keep everything organized. I have begun to carve out the areas of the image that are to remain white. I have a couple hours of carving to do before I print. The two photos below show several carving techniques I will use in this print. For the White Birch trees, I outline the large areas with a #3 cutter and then use a #5 cutter to scoop out large areas. I use a #2 cutter and twist the cutter to create texture in the rock. I will use long lines that vary in width in the water. To see videos of this process, subscribe to my email list. I usually send a newsletter once a week, and it’s full of information on techniques, my schedule of events, and previews of new work. I also post to Instagram @dcastlebabcockart.
- Planning is everything:How I prepare my linoleum block-Part 1
Because I use the reduction process, cutting multiple colors from one piece of linoleum, planning is essential. Once I cut something out of the block, there is no going back. I need to know what the image will look like, what colors I am going to use, and the order in which I will print my colors. My first step is to trace the outside edge of the block onto a piece of tracing paper. This ensures the drawing is the same size as my block. I use tracing paper because it has very little tooth (roughness) and I will transfer this directly onto the block. Also, if I have to make revisions in the original drawing, it’s easy to trace the first draft onto another piece of paper. I use soft, chalk-like pencils and 4B or 6B charcoal to draw the image. My favorite brand of pastel pencils are STABILO CarbOthello. Below is the planning drawing for my next print. Along the side of the drawing, I place samples of the colors I plan to use. Then I decide the order in which I am going to print and carve these colors. More on that topic to follow. It usually takes several revisions until I get what I want. When the drawing is complete, I turn the drawing face down on the linoleum and rub it with the side of my pencil. The lines will be light, but the drawing will transfer in reverse onto the block. Then I begin using Sharpie markers to go over my drawing and make it permanent on the block. I can use just one color of marker, or use several colors. This is a complicated image, so I am using several markers, just so I can keep everything organized. Although the image is now on the linoleum, I keep my drawing close throughout the process so I can constantly refer to it. To see videos of this process, subscribe to my email list. I usually send a newsletter once a week, and it’s full of information on techniques, my schedule of events, and previews of new work. I also post to Instagram @dcastlebabcockart.
- Two new Linoleum Block Prints in Progress
I am finally settling back in after my well-deserved vacation. I have just started two new blocks in preparation for the show season. My full moon prints are best sellers. I have three editions that are almost sold out so it’s time to get to work on something new. Here’s a photo of the block, so far, and a video showing me printing the first color. At this stage I have only cut out the white areas of the image., which is the full moon and the reflection of the moon in the water. The video below illustrates the rainbow roll technique. I wanted the green to change from light to dark to enhance the feeling of the moonlight on the tree leaves. I chose to print green first because the green areas are in the foreground and they are detailed. It’s easier to cut a detail out rather than cut the background around the detail. I will be cutting out those green pine needles, leaves and grass next. Click the link to see the video. https://canva.link/wnmord6gfp6uyxx The second block I am working on is based on this photo I took while walking my dog. I liked it so much that I am using it as wall paper on my phone. I’ll talk more about it next week. If you would like to learn more about linoleum block printing techniques, sign up for my workshop at H’Art Studio and Gallery located on Main Street in North Creek, NY. Kate Hartley runs a great series of workshops and classes. I am planning a printmaking workshop on June 20th. She also sells my matted and framed linoleum block prints, along with my note cards. For more information, contact Kate Hartley. My show schedule is updated on my website. Be sure to check it out.
- Should I buy it Matted or Framed?Framing Makes a Difference!
I offer my linoleum block prints unmatted, matted or framed to give my customers options, depending on their situation. Here are the pros and cons of each of these options. Unmatted I sell my unmatted prints on a Foamcore backing; usually the backing is cut to my recommended frame size. I print on Japanese Mulberry Paper, which is very fragile. I have found this is the best way to protect the art. Unmatted prints are the best option for customers who do their own framing or know someone who does framing. Yes, unmatted prints are less expensive, but be sure to consider the cost of quality matting and framing. This 9 x 12 unmatted print sells for $75 This matted print sells for $90 This is a great option for people who are shipping the print or carrying it on a plane. Most, but not all of my prints are matted to standard sizes. I will usually state the size in the product description on my online store. I offer matted prints so customers who want something different than the frame I have chosen for a particular print. I use acid-free matting and backing. Some cheaper mat boards are acidic and will discolor the print over time. I usually choose a white top mat that matches the Mulberry Paper I use, with an inside mat in a color that I used in the image. Because I do all my own matting and framing, I can change the matting to suit your taste. This framed print sells for $140. Framed I usually use simple wooden frames in brown or black. I believe it is important that the frame complements the artwork. I want people to focus on my linoleum block prints, not the frame. I cut and build all my frames, so I can custom frame a linocut if you want something special. If you check my prices for framing, you’ll see that I charge much less than framing it at a big box store. I have low overhead , so I can pass the savings on to my customers. I have had customers come into my booth at an art festival and comment on how nicely everything is framed. I have also walked around a show and noticed framing that detracts from the art; some artists use inexpensive readymade frames and you can see the difference. Customers have also told me that they purchased something unframed to save money and the art is stored under their bed because the cost of framing is so expensive or they haven’t had time to take it to the framer. Framing is important. When you shop for art, be sure to consider all the factors I have listed when making your decision.
- Plan a Shopping Trip to One of These Great Galleries this Summer
I have been working diligently to create a better shopping experience on my online store. However, nothing beats seeing the artwork in person. If you can’t make it to a show and want to see my original work, here are three galleries where you can shop: Gallery 46 in Lake Placid, NY Gallery 46 is located right on Main Street in Lake Placid. There is a variety of high quality fine art and fine craft, featuring, of course, images of the Adirondacks. I just delivered twenty plus linoleum block prints on May 14th. If you are in the high peaks, put a visit to the gallery on your to do list. Just up the road is the Arts Center of Lake Placid, which is hosting “The Art of Flight”, an Audubon bird exhibition. It opens May 22nd and runs until July 3rd. I am excited to see my new linocut, “Loon Family” on display there. H’art Studio and Gallery H’Art Studio and Gallery is located on Main Street in North Creek, NY. Kate Hartley runs a great series of workshops and classes. I am planning a printmaking workshop on June 20th. She also sells my matted and framed linoleum block prints, along with my note cards. For more information, contact Kate Hartley. The Copper Shop on the Roycroft Campus If you have never been to the historic Roycroft Campus, plan a visit and go on a tour. The Roycroft Campus is located in East Aurora, just south of Buffalo. It's less than two hours from Rochester, and yet, most Rochestarians don’t even know it exists. This is the birthplace of the Arts & Crafts Movement. The Copper Shop building is now a gallery with all sorts of treasures. You can shop for my framed and matted linocuts. If you feel the need to get away for a weekend or even a day, plan a visit to one of these great artist spaces and support the local arts.
- My 2026 Show Schedule!
Although it was 35 degrees when I woke up this morning, I know that the art festival season is upon us. When I realize we are almost half way through 2026, I get a little panicked. I have been applying to shows all winter long and my show schedule is set. Here’s a preview of what I have booked this year: Corn Hill Arts Festival: This show takes place in the historic Corn Hill neighborhood of Rochester New York on July 11th and 12th. I am usually on Atkinson Street, but I haven’t gotten my booth assignment yet. The hours are 10-6 Saturday and 10-5 Sunday. Here’s the link to the festival website: https://cornhillartsfestival.com/. The weather hasn’t been our friend the last two years, so we are due for a nice weekend. Fine Art & Woodworking Show: I always look forward to this three-day show in Northville, NY. It is run by the Rotarians and they do a super job organizing the event. Here’s a shout out to Susan Owens, who begins planning fifty-one weeks ahead. The Rotarians could run a master class on how to treat the artists well. Here’s a link the Rotary webpage: https://northvillerotary.com/woodworking-and-fine-arts-weekend/ The hours are 5-8 Friday the 17th, 10-4 Saturday the 18th, and 10-3 on Sunday the 19th. Speculator Craft Fair: This is a one day show on a Thursday! This year it’s August 13th from 9-4 in Speculator, NY. This is a long day for me but it’s worth it; if you are in the area, check it out. I have a couple shows booked for the fall as well. Check the art shows page on my website for more information. I look forward to seeing you soon.
- Can Linoleum Prints Turn a Simple Sketch Into Layered Art?
Art often begins with a quiet idea, a rough sketch, or a shape noticed during a walk through the city. From there, the creative process slowly grows into something textured and expressive. Printmaking brings that feeling to life through layers, color choices, and thoughtful carving techniques. Among the many styles used in modern workshops and studio sessions, linoleum block art demonstrations in NY, continue to draw attention from artists and curious beginners who enjoy hands-on learning. Transitioning from a plain surface to a finished print takes patience. Still, the process feels rewarding from the first carved line to the final reveal. Understanding the Beauty of Layered Printmaking Linoleum printing has a soft, handmade quality that gives every piece a distinct personality. Unlike digital artwork, each print carries subtle marks created during carving and pressing. Those details often become the most memorable part of the artwork. The process begins with transferring a sketch onto a linoleum surface. Artists carefully carve away sections that will remain unprinted. Ink is then rolled across the block before pressing it onto paper. Every stage adds a fresh visual layer that slowly builds depth and texture. This method allows artists to experiment with bold shapes, gentle gradients, and natural movement. Some prints lean toward abstract designs, while others capture landscapes, animals, or everyday city scenes. Watching the Process Come Together Live demonstrations create an engaging way to understand printmaking techniques. Observing each carving stage helps viewers notice how small adjustments influence the final image. A simple curve or texture cut into the block can completely shift the artwork's mood. Demonstrations also create space for questions and conversations. Many participants enjoy discussing carving tools, paper choices, and color layering methods as they watch the artwork develop in real time. The atmosphere often feels relaxed and creative rather than formal. Visitors can see how mistakes occasionally become part of the design, giving each print an organic appearance that cannot be duplicated exactly. How Layers Shape the Final Artwork Color layering gives printmaking its rich visual character. One color is printed first, followed by additional carved sections and new layers of ink. With every stage, more detail appears. This gradual method is known as reduction linoleum block printing, where portions of the original block are removed between print runs. Since the block changes permanently after each carving stage, planning becomes an important part of the process. Artists must think several steps ahead before applying the next layer. That challenge often adds excitement to the experience because each print becomes part of a carefully timed sequence. Once the final layer is complete, the block cannot recreate the earlier stages. Why Hands-On Demonstrations Feel Inspiring Many people connect with art more deeply when they can observe the process rather than only viewing finished pieces. Demonstrations offer that connection through movement, texture, and interaction. The sound of carving tools against linoleum, the smooth roll of ink, and the first reveal of a fresh print create an atmosphere filled with anticipation. Even first-time visitors often leave feeling inspired to explore creative projects of their own. Workshops and demonstrations also encourage slower, more deliberate observation. Instead of rushing through an exhibit, viewers take time to notice the steps behind every image. That experience helps build appreciation for handcrafted artwork and traditional printmaking methods. A Creative Experience for Every Skill Level Printmaking sessions welcome both experienced artists and curious newcomers. Some participants arrive with detailed sketches ready to transfer onto blocks, while others prefer experimenting freely with shapes and patterns. Beginners often enjoy the tactile nature of carving and printing. The process feels approachable because progress happens step by step. There is room for experimentation without pressure to create flawless results. Experienced artists appreciate the medium's flexibility as well. Layering colors, adjusting textures, and testing different carving depths can produce entirely different outcomes from the same original design. Bringing Handmade Art Into Modern Spaces Linoleum prints work beautifully in modern interiors because they blend texture with simplicity. Framed prints can soften minimalist spaces, add warmth to offices, or create conversation pieces in living rooms and galleries. Many collectors are drawn to handcrafted prints because each edition carries subtle differences. Small variations in ink coverage and pressure give every print a distinct character. The appeal also comes from the visible effort behind the artwork. Each layer reflects time, patience, and careful planning, making the final piece feel thoughtful and personal. A Closer Look at the Craft Exploring printmaking through demonstrations offers more than a visual experience. It creates an opportunity to understand how layers, carving techniques, and color choices shape each composition from beginning to end. Those interested in discovering handcrafted printmaking methods or adding artistic depth to their collections can explore upcoming sessions and artwork through D. Castle Babcock Art. Frequently Asked Questions What makes linoleum printing different from digital art? Linoleum printing creates handmade textures and slight variations that cannot be duplicated exactly. Each print carries physical details formed during carving and inking. Is reduction printing difficult for beginners? The process requires planning, but beginners can still enjoy learning the technique through guided workshops and demonstrations. How long does a layered print usually take to complete? The timeline depends on the number of color layers and carving stages. Some prints may take several hours, while detailed pieces can take multiple sessions.
- Finding Beauty in Everyday -ThingsArtistic Inspiration from my trip to the west coast
I am writing this as I gaze out the window of a cruise ship heading for British Columbia, so this will be short and sweet. Most of my photos are on my DSLR, but here are a couple examples of what I've seen so far. There are a lot of block printers I. the area. Here is one example that transformed into a shop sign. Wildlife is abundant. I saw whales yesterday, and here is an Eagle from the day before. Here is the sample of the landscape: Next week I will be home and ready to work again. Please note that I will not be shipping orders or answering email from now until May 10th.
- Finding Beauty in Everyday -ThingsArtistic Inspiration from my Dog Walks
I haven’t been able to make prints for a couple of weeks now. The rest of my life, professional and personal, has gotten in the way. I am anxious to start something new. Today I am going to share with you a few photos I have taken during my daily dog walks that I hope to use as the basis for new prints. I have learned that I don’t have to go somewhere exotic to find beauty in the world around me. These are parks I visit frequently and can always find something intriguing as I walk. In this age of social media and digital everything, my walks in the parks help to quiet my mind and heighten my powers of observation. Even if I have walked a path fifty times before, I can find new inspiration. I believe this is one reason my linoleum block prints appeal to so many people. I am an Impressionist even though I am not able to create in “Plein Air” as the original Impressionist painters did. My process, which I have described in previous blogs, just doesn’t allow me to do it. I observe changes in light and atmosphere as I complete my daily walks. I use similar techniques of dots and small lines rather than large, flat shapes in my work. The technique of using small dots of different colors to let your eye do the blending is called optical color mixing. Impressionist painters used this technique. I am off to the Pacific Northwest for a few days on a much needed vacation. I will share new inspirational photos with you soon. I am looking forward to seeing the similarities and differences in the west coast landscape. Please note that I will not be shipping orders or answering email from now until May 10th.
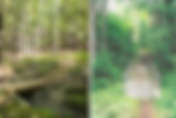
- How I work from photos to create an original Linoleum Block Print?
It starts with an idea running around in my head about the image I want to create. Sometimes I am able to work totally from imagination or memory, but most times I need a little help from the numerous photos I have taken during my time out walking and hiking. The concept was to portray the beginning of the trail; most people take photos once they reach the summit, but the beginning of the journey is important as well. Here are two photos I used as inspiration for my linocut Trailhead II. I wanted to show a footbridge with a creek running beneath it. Neither of these photos show running water, so I added that in. The photos helped with the foliage and the mossy rocks that I see when I start a hike. The dog on the right is Sunny, my hiking companion in the 1990s. I also wanted a trail marker or sign that is so typical of the Adirondack trails. I do work from photos, but they are usually photos I take or photos supplied by a customer. As you can see from the finished product below, I made significant changes to the composition in the finished print below. I am anxious to get out on the trails again, now that the weather is finally warming. Looking at this image reminds me of the many great hikes I have taken. Hiking is about enjoying the journey. You can purchase this print online (see the link below) or at my shows this Summer. Show season will be here before you know it! My show at Gloversville May 2nd! If you are in the Adirondacks, check out my exhibit at the Micropolis Gallery on Main Street. The Art of Flight opens in May at the Art Center of Lake Placid in May. I just finished the Loon print I have shown you in progress; I’m working on framing right now. You’ll see the finished product next month. Please Subscribe to my newsletter to see all my blogs, and get updates on my shows. To see my finished Linoleum Block Prints, featuring landscapes of upstate New York, dogs and their people, and moonlight prints, visit my online store at www.DCastleBabcockArt.com.
- What Kind of Art am I Looking at?
Oftentimes people come into my booth during an art festival and ask, "What kind of Art is this?". Many otherwise intelligent and educated people have little knowledge when it comes to prints and reproductions. This is due to a lack of good art education in our public schools and artists who provide misinformation when it comes to selling reproductions. Today I am going to clarify the difference between Linocuts (or Linoleum Block Prints), Etchings, and Giclee's. Below are photos of an Etching and a Linoleum Block Print. Both of these are hand-pulled prints. If you see an embossing line around the edge of the image, like the print on the left, you are looking at an Etching. Etchings are created on a metal plate. The embossing line you see is the mark of the plate being pressed into damp paper as it is run through a printing press. It has an edition number on the bottom left corner. The photo on the right is a detail from my linocut Marcy Field II . If you look carefully you can see the layers of ink from the reduction process, which I have described in other blogs. Marcy Field II is a large print with an edition of fifteen. This is a Giclee by Kelly Lattimore. It is a photographically reproduced print. The inks are high quality but it is not a hand-pulled print. Notice there is no edition number at the bottom. There is nothing wrong with purchasing a Giclee. I own a couple myself. The example above was originally a painting that sold for thousands. I love the image and I could not afford the original. Some artists do sign their Giclee's and present them as something they are not. This upsets me and confuses buyers. The term “print” can mean a hand-pulled etching or linocut; some people use this term for reproductions. Every print I sell, whether you purchase it matted or framed, is an original Linoleum Block Print. The only exception to this are the note cards. I think it is important for buyers to be informed when they make purchases. I hope that this information will help you make wise choices as you shop in galleries and at art festivals. My show at Gloversville ends soon! If you are in the Adirondacks, check out my exhibit at the Micropolis Gallery on Main Street. The show runs through the end of April. The Art of Flight opens in May at the Art Center of Lake Placid. I just finished the Loon print I have shown you in progress; I’m working on framing right now. You’ll see the finished product next month. Please Subscribe to my newsletter to see all my blogs, and get updates on my shows. To see my finished Linoleum Block Prints, featuring landscapes of upstate New York, dogs and their people, and moonlight prints, visit my online store at www.DCastleBabcockArt.com .
- Why I Believe a Birch Bark Picture Frame Can Transform Your Home Decor?
Have you ever wondered how a simple frame can completely change the way your art or photos feel in a room? When I first discovered a birch bark picture frame, I was amazed at how much warmth and character it added to my space. Unlike regular frames, the natural texture of birch bark brings a subtle, organic elegance that immediately draws attention and complements any artwork. Over time, I’ve learned how to choose, display, and care for these frames to make the most of their unique charm, and I want to share those insights with you. How do I Choose the Perfect Birch Bark Frame for Any Space? Selecting the right birch bark picture frame requires a little thought, but it’s a rewarding process. I usually consider the size of the artwork, the room’s lighting, and the surrounding decor. For smaller pieces, a lighter frame works best, while larger artworks can handle a bolder bark texture. I’ve learned that these subtle differences make a significant impact on how the frame complements the space. I also like to mix and match. For instance, pairing a birch bark frame with a simple wooden shelf or a neutral-colored wall helps the frame stand out without clashing. I’ve found that this approach keeps the room balanced while still highlighting the natural elegance of birch bark. Transitioning between different design elements becomes effortless when the frame’s natural tones are used strategically. Practical Tips for Displaying and Caring for Birch Bark Frames From experience, maintaining a birch bark frame is straightforward, but important to keep its natural beauty intact. I usually dust mine gently and avoid placing them in direct sunlight for long periods to prevent the bark from drying out. Another tip I’ve learned is to handle the frame with clean hands when switching artwork to prevent oils or dirt from affecting the bark. These small steps ensure that your frame remains a centerpiece for years to come. Additionally, I enjoy experimenting with mixed displays. Combining multiple birch bark frames of different sizes creates a gallery effect that feels curated yet personal. I recommend starting with a single statement piece and gradually adding others. This approach allows you to build a cohesive display without overwhelming your walls. Why I Recommend Birch Bark Frames for Gifts and Special Occasions? In my experience, giving a birch bark frame as a gift is always a hit. Friends and family appreciate the thoughtfulness because each frame is naturally unique and feels handcrafted. I remember gifting one to a colleague for her office; it instantly became a conversation starter. The personal and organic nature of these frames makes them ideal for celebrating milestones, displaying cherished memories, or even commemorating achievements. Using a birch bark frame shows care and attention to detail. I often encourage people to pair it with a meaningful photo or artwork. This combination transforms a simple frame into a treasured keepsake that holds emotional value, not just decorative appeal. Conclusion From my perspective, a birch bark picture frame is more than just a way to display art; it’s a way to bring warmth, authenticity, and personality into your home. Whether for your own collection or as a thoughtful gift, these frames provide a natural elegance that draws attention while complementing any space. I encourage everyone to explore the subtle textures, the organic charm, and the timeless appeal that a birch bark frame offers. FAQs Can a birch bark frame be used outdoors? I recommend keeping them indoors to preserve the natural bark texture. Direct exposure to weather can damage the frame over time. How do I clean a birch bark frame without damaging it? I gently dust it with a soft, dry cloth. Avoid using water or harsh cleaners, as they can dry or discolor the bark. Are birch bark frames available in custom sizes? Yes, I often order custom-sized frames to perfectly fit special artwork or photographs, ensuring a seamless display. Do birch bark frames match modern decor styles? Absolutely. I’ve paired them with minimalist, rustic, and even contemporary interiors. The natural tones make them versatile and stylish. What type of artwork works best with a birch bark frame? I find watercolors, nature photography, and simple sketches work beautifully. The frame enhances rather than competes with the artwork.